> ## Documentation Index
> Fetch the complete documentation index at: https://docs.loupp.dev/llms.txt
> Use this file to discover all available pages before exploring further.
# How to Link Shared Host with Loupp
> Complete guide to connect your shared hosting account with Loupp for automated deployments and management
## Overview
Linking your shared hosting account with Loupp enables automated deployments, environment management, and server monitoring. This guide walks you through the complete process of establishing the connection between your shared hosting provider and Loupp.
## Prerequisites
Before linking your shared hosting with Loupp, ensure you have:
* Active shared hosting account with shell access enabled
* Hosting provider that supports SSH connections
* PHP and Composer available on your hosting
* Sufficient disk space for your applications
## Step-by-Step Linking Process
### Step 1: Enable Shell Access on Your Hosting
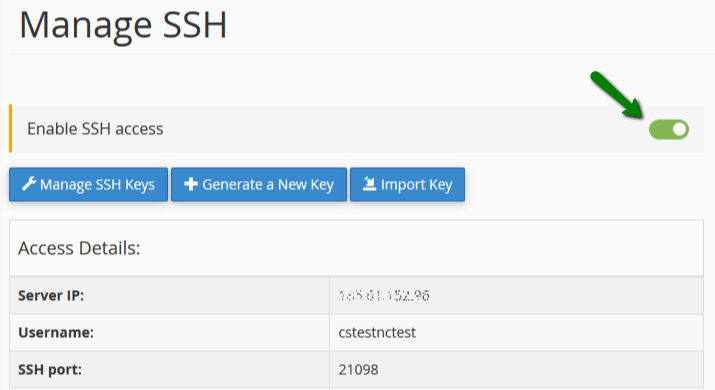
First, you need to enable SSH access in your hosting control panel:
Log in to your hosting provider's cPanel dashboard
Go to the "Security" tab and select "SSH Access"
Toggle the SSH button to "On" to enable shell access
Some hosting providers may require you to contact support to enable SSH access
 ### Step 2: Generate SSH Key in Loupp
Loupp will automatically generate SSH keys for secure server access:
In Loupp dashboard, navigate to "Shared Hosting Servers" and click "New Server"
Choose your hosting provider from the list or select "Custom" for unsupported providers
Fill in your server information:
* **Name**: Descriptive identifier for your server
* **Domain**: Your website domain
* **Server IP**: Hosting server IP address
* **Username**: Hosting account username
* **Port**: SSH port (usually 21002 for shared hosting)
* **Files Directory**: Where files are stored (default: repository name)
* **Public Directory**: Publicly accessible directory (default: public\_html)
Loupp automatically generates a unique SSH key pair for your server
### Step 3: Import SSH Key to Your Hosting
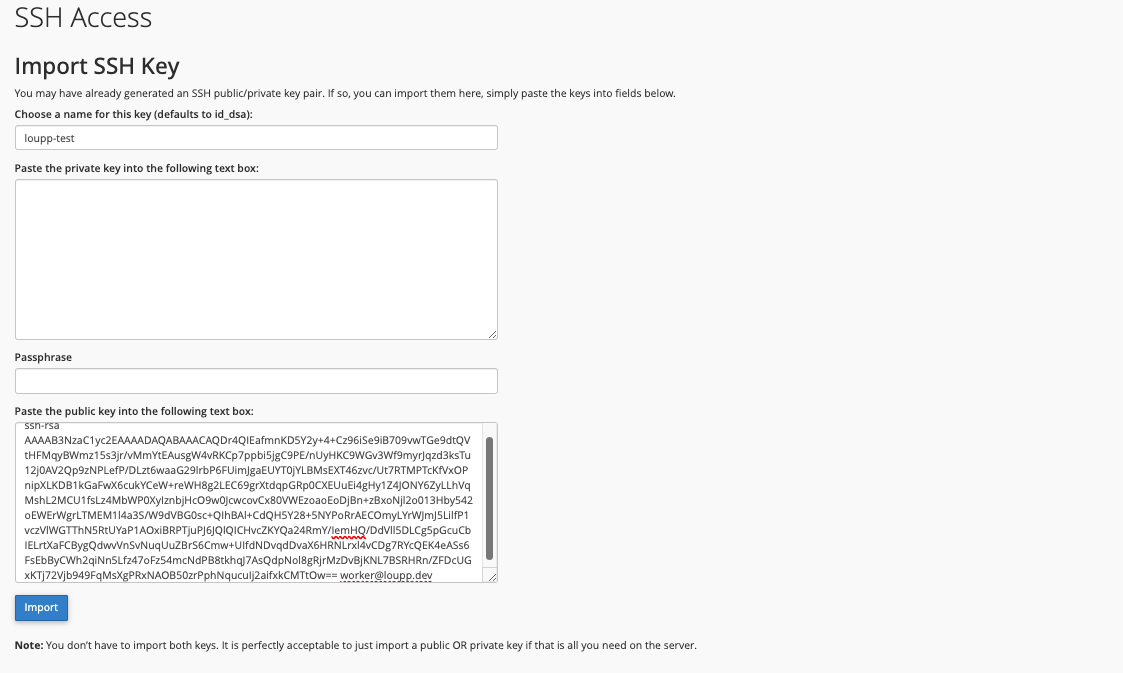
Copy the generated SSH key from Loupp and add it to your hosting account:
Copy the generated SSH public key from Loupp dashboard
In cPanel, go to "Security" → "SSH Access" → "Manage SSH Keys"
Click "Import" and paste the SSH key from Loupp into the "PUBLIC KEY" textbox
Make sure to copy the entire public key, including the "ssh-rsa" prefix and comment
Click "Manage Action" and then "Authorize" to activate the SSH key
### Step 2: Generate SSH Key in Loupp
Loupp will automatically generate SSH keys for secure server access:
In Loupp dashboard, navigate to "Shared Hosting Servers" and click "New Server"
Choose your hosting provider from the list or select "Custom" for unsupported providers
Fill in your server information:
* **Name**: Descriptive identifier for your server
* **Domain**: Your website domain
* **Server IP**: Hosting server IP address
* **Username**: Hosting account username
* **Port**: SSH port (usually 21002 for shared hosting)
* **Files Directory**: Where files are stored (default: repository name)
* **Public Directory**: Publicly accessible directory (default: public\_html)
Loupp automatically generates a unique SSH key pair for your server
### Step 3: Import SSH Key to Your Hosting
Copy the generated SSH key from Loupp and add it to your hosting account:
Copy the generated SSH public key from Loupp dashboard
In cPanel, go to "Security" → "SSH Access" → "Manage SSH Keys"
Click "Import" and paste the SSH key from Loupp into the "PUBLIC KEY" textbox
Make sure to copy the entire public key, including the "ssh-rsa" prefix and comment
Click "Manage Action" and then "Authorize" to activate the SSH key
 ### Step 4: Verify Connection
After importing the SSH key, Loupp will verify the connection:
Loupp automatically tests SSH connectivity to your server
Check that your server status shows as "Active" in the dashboard
The verification process may take a few minutes to complete
Review connection logs to ensure successful authentication
## Troubleshooting Common Issues
### SSH Connection Problems
**Problem**: SSH connection is refused
**Solutions**:
* Verify SSH is enabled in your hosting control panel
* Check if your hosting plan includes SSH access
* Contact hosting provider to enable shell access
* Verify the correct port number (usually 21002)
**Problem**: SSH key authentication fails
**Solutions**:
* Ensure the complete public key was copied
* Verify the key is properly authorized in cPanel
* Check that the username matches your hosting account
* Try regenerating the SSH key in Loupp
**Problem**: Cannot connect on specified port
**Solutions**:
* Confirm the correct SSH port with your hosting provider
* Try common ports: 22, 21002, 2222
* Check if your hosting uses a custom SSH port
* Verify firewall settings allow SSH connections
### Hosting Provider Issues
**Problem**: Hosting provider doesn't support SSH
**Solutions**:
* Upgrade to a hosting plan with shell access
* Switch to a provider that supports SSH
* Use alternative deployment methods (FTP, Git hooks)
* Contact hosting support for SSH enablement
**Problem**: Required tools not available
**Solutions**:
* Verify PHP version meets requirements (7.4+)
* Check if Composer is installed
* Contact hosting provider to install missing tools
* Use hosting provider's one-click installers
## Next Steps After Linking
Once your shared hosting is successfully linked with Loupp:
Link your Git repository for automated deployments
Set up environment variables and configuration files
Perform your first deployment to verify everything works
Configure logging and monitoring for your application
### Step 4: Verify Connection
After importing the SSH key, Loupp will verify the connection:
Loupp automatically tests SSH connectivity to your server
Check that your server status shows as "Active" in the dashboard
The verification process may take a few minutes to complete
Review connection logs to ensure successful authentication
## Troubleshooting Common Issues
### SSH Connection Problems
**Problem**: SSH connection is refused
**Solutions**:
* Verify SSH is enabled in your hosting control panel
* Check if your hosting plan includes SSH access
* Contact hosting provider to enable shell access
* Verify the correct port number (usually 21002)
**Problem**: SSH key authentication fails
**Solutions**:
* Ensure the complete public key was copied
* Verify the key is properly authorized in cPanel
* Check that the username matches your hosting account
* Try regenerating the SSH key in Loupp
**Problem**: Cannot connect on specified port
**Solutions**:
* Confirm the correct SSH port with your hosting provider
* Try common ports: 22, 21002, 2222
* Check if your hosting uses a custom SSH port
* Verify firewall settings allow SSH connections
### Hosting Provider Issues
**Problem**: Hosting provider doesn't support SSH
**Solutions**:
* Upgrade to a hosting plan with shell access
* Switch to a provider that supports SSH
* Use alternative deployment methods (FTP, Git hooks)
* Contact hosting support for SSH enablement
**Problem**: Required tools not available
**Solutions**:
* Verify PHP version meets requirements (7.4+)
* Check if Composer is installed
* Contact hosting provider to install missing tools
* Use hosting provider's one-click installers
## Next Steps After Linking
Once your shared hosting is successfully linked with Loupp:
Link your Git repository for automated deployments
Set up environment variables and configuration files
Perform your first deployment to verify everything works
Configure logging and monitoring for your application